Depending on the country and number type, you may need an approved business verification. Prepare the following information:
Your legal business name, registration number, and registered address
A current business registration document
The name and contact details of an authorized representative
The country, number type, and local area code that you need
For a German business, a commercial register extract or a business registration document is usually accepted. The company name, registration number, and address must match the data that you enter in telli.
A local number can require an address in the area covered by its prefix. Do
not use a PO box. Requirements differ by country and number type; the
verification form shows the required documents for your selection.
Go to Phone numbers, select Verifications, and stay on the Regulatory Compliance tab.
2
Start a verification
Select Add Verification, then choose the country and number type. Enter a clear internal name, such as DE Local - Berlin office.
3
Enter the business details
Enter the legal business data and the authorized representative exactly as shown in the registration document.
4
Upload and submit the documents
Upload the documents requested in the form. Submit the verification and track its status on the Regulatory Compliance tab.
The form takes about five minutes when your documents are ready. Approval often takes one or two business days, but it can take longer if the provider needs more information.
Start a business verification for a local German number
Select the country and number type. Local numbers support voice. Available mobile numbers can also support SMS.
3
Select the verification and prefix
If required, select an approved business verification. For a German local number, enter the area code without the leading 0, for example 30 for Berlin.
4
Confirm the purchase
Select Continue, choose an available number, review the details, and confirm the purchase.
5
Assign how the number is used
Open the new number. Assign the agent that answers incoming calls. For outgoing calls, use the global pool, reserve the number for one agent, or turn outbound use off.
Search for a local German phone number
Number availability and capabilities depend on the country and number type.
Check the Voice and SMS badges in the phone number list.
To show your verified business name on outbound calls from a telli-managed number, set up Branded Calling.
A common setup is to keep your existing public number and forward incoming calls to a telli number. Your existing number stays with your current provider. Outgoing calls from your existing phone system are not changed.Choose when telli should answer:
Forwarding rule
Result
Always
Every incoming call goes directly to the telli agent.
No answer
The telli agent answers when your team does not answer.
Busy
The telli agent answers when the line is busy.
Outside business hours
A schedule in your provider or PBX sends calls to telli.
Many mobile networks support the following GSM MMI codes. Replace <destination> with the full telli number, including the + and country code. Enter the code in the phone app and press the call button.
Forwarding rule
Activate
Deactivate or delete
Always
**21*<destination>#
##21#
No answer
**61*<destination>#
##61#
Unreachable
**62*<destination>#
##62#
Busy
**67*<destination>#
##67#
Codes and their effects can differ by provider, plan, and device. Fixed-line
services and PBXs often use different codes. Some codes can also overwrite
or remove existing voicemail forwarding. Check your provider’s instructions
before using them.
Buy a telli number and assign an inbound agent. Copy the full number in E.164 format, including the leading + and country code.
2
Configure your provider or phone system
Create the forwarding rule in your provider portal, router, or PBX. For example, a FRITZ!Box usually places this under Telephony > Call Handling > Call Diversion. Menu names can differ by version.
3
Preserve the original caller ID
Ask your provider or PBX administrator to pass the original caller number. This setting can be called CLIP no screening, original caller ID, or P-Asserted-Identity.
4
Test the complete path
Call your existing number from another phone. For a no-answer rule, do not answer the original line. Confirm that the correct telli agent answers and that the call appears in Conversations.
Call forwarding is configured outside telli. Your provider can charge for the
forwarded call leg. Check the price, supported forwarding rules, caller ID
behavior, and maximum ring time with the provider.
Before you go live, confirm these items with your phone provider or PBX administrator:
Which forwarding rules are supported: always, no answer, busy, and time based
Whether the original caller ID reaches telli
Whether voicemail or an IVR answers before the forwarding rule starts
Whether forwarded calls have additional costs or concurrency limits
How to disable the rule quickly and how to prevent forwarding loops
If no call appears in Conversations, the call did not reach telli. Check the forwarding rule with your provider. If the call appears but the wrong agent answers, check the inbound assignment on the telli number.
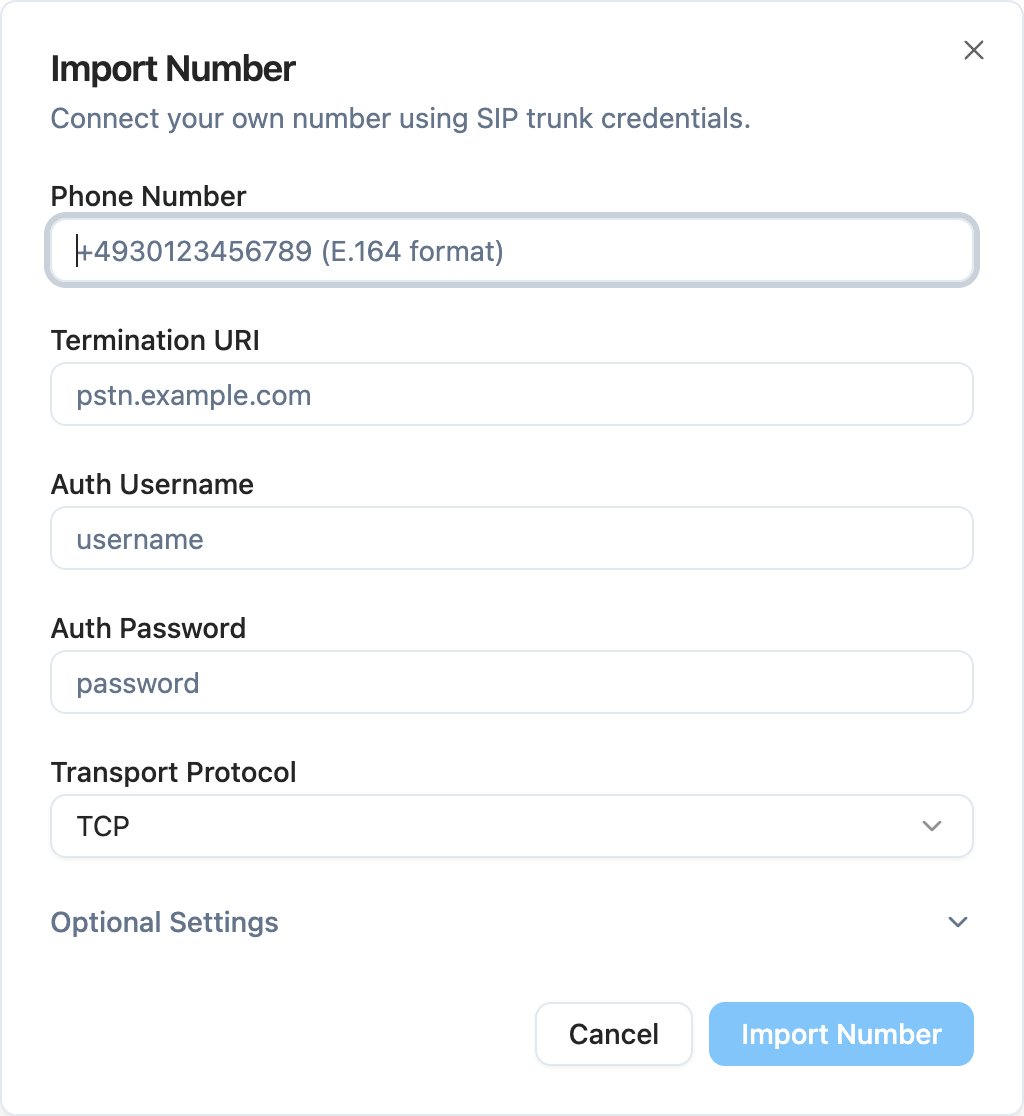
In telli, add the phone number, provider termination URI, SIP credentials,
and transport protocol. These settings let telli place outgoing calls through
your provider.
In your SIP provider, route incoming calls for that number to telli. Provider
field names differ, but the destination is always:
SIP transport protocol. Supported values are TCP, UDP, and TLS. The default is TCP.
TCP
From User
Optional. What outgoing calls send as the SIP From user: Phone number or Auth username. Some providers, for example CallOne, reject calls unless the From user is the auth username.
Phone number
From Host
Optional. Host of the SIP From header for outgoing calls. Leave empty for the telli default. Required when the From user is the auth username.
sip.provider.com
Do not include the sip: prefix in the Termination URI. Enter only the
hostname or IP address. The incoming destination in your SIP provider does
use the sip: prefix.
Choose the transport protocol that matches your provider’s trunk settings. If your provider does not specify one, keep the default TCP.
If outgoing calls fail with 403 Forbidden - Invalid Domain, set From Host
to the domain your provider expects, usually the termination host. If they fail
with 403 Username in From Field required, set From User to Auth username.
Both fields are under Optional Settings.
Cold transfers also need your provider to
permit SIP REFER on the trunk. Most providers disable this by default, and some
split it across more than one setting. Warm transfers place a separate outgoing
call and work without it.
Use these examples to map provider settings to the telli fields. Each setup includes incoming routing to telli and the outgoing termination settings that you enter in telli.
In the Twilio Console, create an Elastic SIP Trunk or open the trunk used by your imported number.
2
Route incoming calls to telli
Open Origination and add sip:axg8odfh9dw.sip.livekit.cloud as the Origination URI.
3
Configure outgoing calls
Open Termination and note the Termination URI, for example your-trunk.pstn.twilio.com or your-trunk.pstn.frankfurt.twilio.com. Under Authentication > Credentials, create a username and password.
4
Assign the phone number
Make sure that your phone number is assigned to this trunk.
5
Allow call transfers
For cold transfers, open General settings and enable Call Transfer (SIP REFER) and the optional Call Transfers to the PSTN via your Trunk. Twilio disables both by default.
6
Add the number to telli
In telli, enter your phone number, the Twilio Termination URI without sip:, the Twilio credentials, and the transport protocol configured for your trunk.
In Telnyx, create a SIP connection and select the FQDN connection type.
2
Route incoming calls to telli
Under Authentication and Routing, add axg8odfh9dw.sip.livekit.cloud as an FQDN and set DNS Record Type to SRV. Do not include the sip: prefix in this field.
3
Set the number format
Set both Destination Number Format and Origination Number Format to +E.164.
4
Configure outgoing credentials
Configure credential-based authentication with a username and password.
5
Assign the phone number
Make sure that your phone number uses this Telnyx SIP connection.
6
Add the number to telli
In telli, enter your phone number, sip.telnyx.com as the Termination URI without sip:, the Telnyx credentials, and the transport protocol configured for your SIP connection.
Telnyx permits cold transfers by default. There is no call transfer setting to enable on the SIP connection.
CallOne authenticates outgoing calls on the SIP From user and rejects INVITEs that carry the phone number there. The From host must be your CallOne SIP domain.
1
Route incoming calls to telli
In the CallOne portal, route incoming calls for your number to sip:axg8odfh9dw.sip.livekit.cloud.
2
Add the number to telli
In telli, enter your phone number, your CallOne SIP domain as the Termination URI, for example 1234.voip.callone.de, the SIP account username and password, and the transport protocol configured for your account.
3
Set the From identity
Under Optional Settings, set From User to Auth username and From Host to the same domain as the Termination URI.