> ## Documentation Index
> Fetch the complete documentation index at: https://docs.telli.com/llms.txt
> Use this file to discover all available pages before exploring further.
# Contact Properties
> Define a structured schema for your contacts with typed custom properties that you can use across the telli platform
Contact properties let you define a structured schema for your contacts — adding custom fields like "Lead Type", "Contract Start Date", or "Preferred Language" that are relevant to your business. Unlike free-text notes, every property has a defined type, so your data stays clean and consistent across all contacts.
### Why Contact Properties?
Before contact properties, the only way to attach custom data to a contact was through unstructured text fields. This worked, but had significant downsides:
* **No consistency** — One team member might write "yes", another "true", another "ja"
* **No validation** — Typos and formatting mistakes went unnoticed
* **No structure** — You couldn't filter, sort, or report on free-text fields reliably
Contact properties solve this by introducing **typed, validated fields** that ensure your contact data is structured and reliable.
***
## Property Types
telli supports the following property types, each with its own input and validation:
| Type | Description | Example Value |
| ---------------- | --------------------------------------- | --------------------------------------------- |
| **Text** | Free-text string | "Enterprise" |
| **Number** | Numeric value | 42 |
| **Boolean** | Yes or No | Yes |
| **Date** | Calendar date | 2025-03-15 |
| **Date & Time** | Calendar date with time | 2025-03-15 at 14:30 |
| **Select** | Single choice from a predefined list | "Gold" |
| **Multi-Select** | Multiple choices from a predefined list | "German", "English" |
| **Phone Number** | Phone number in international format | +49 172 1234567 |
| **Email** | Email address | [sarah@example.com](mailto:sarah@example.com) |
> **Tip:** Choose the most specific type for your data. For example, use **Date** instead of **Text** for dates — this ensures proper validation and a better editing experience in the contact details panel.
***
## Create Your First Property
### 1. Navigate to Settings
Head over to **Settings** and select the **Properties** tab.
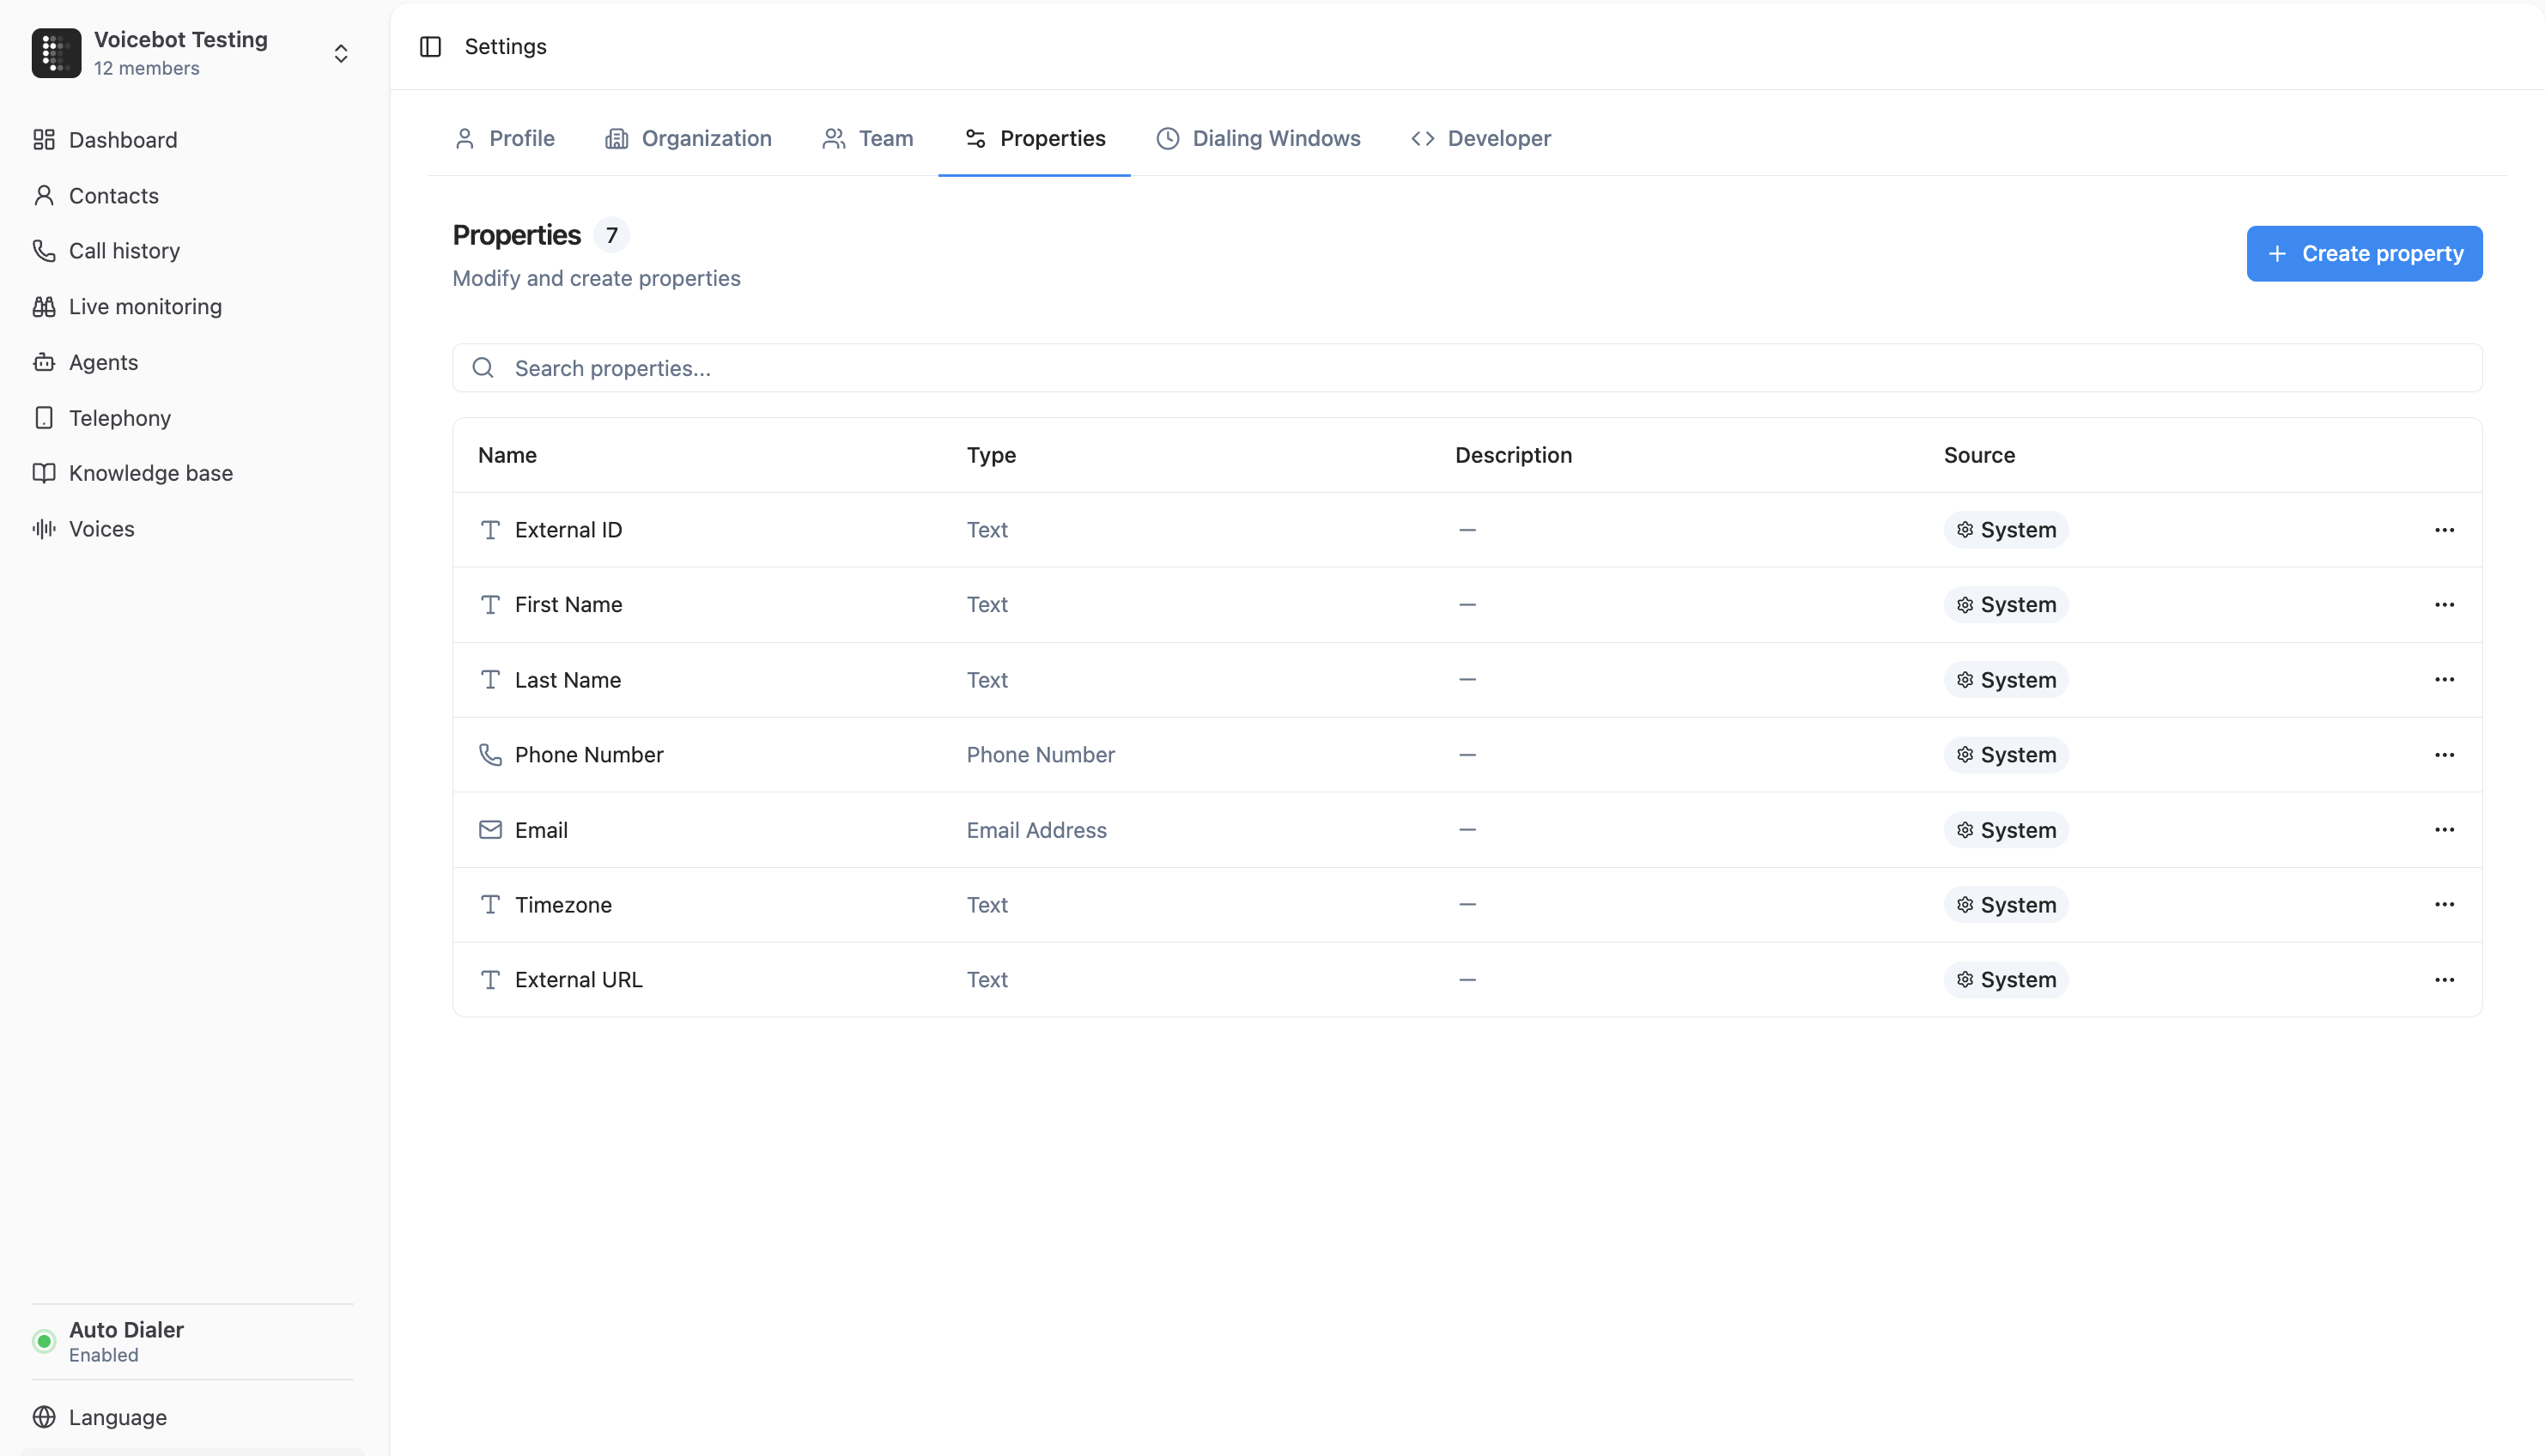 ### 2. Click "Create Property"
Click the **Create property** button to open the property editor.
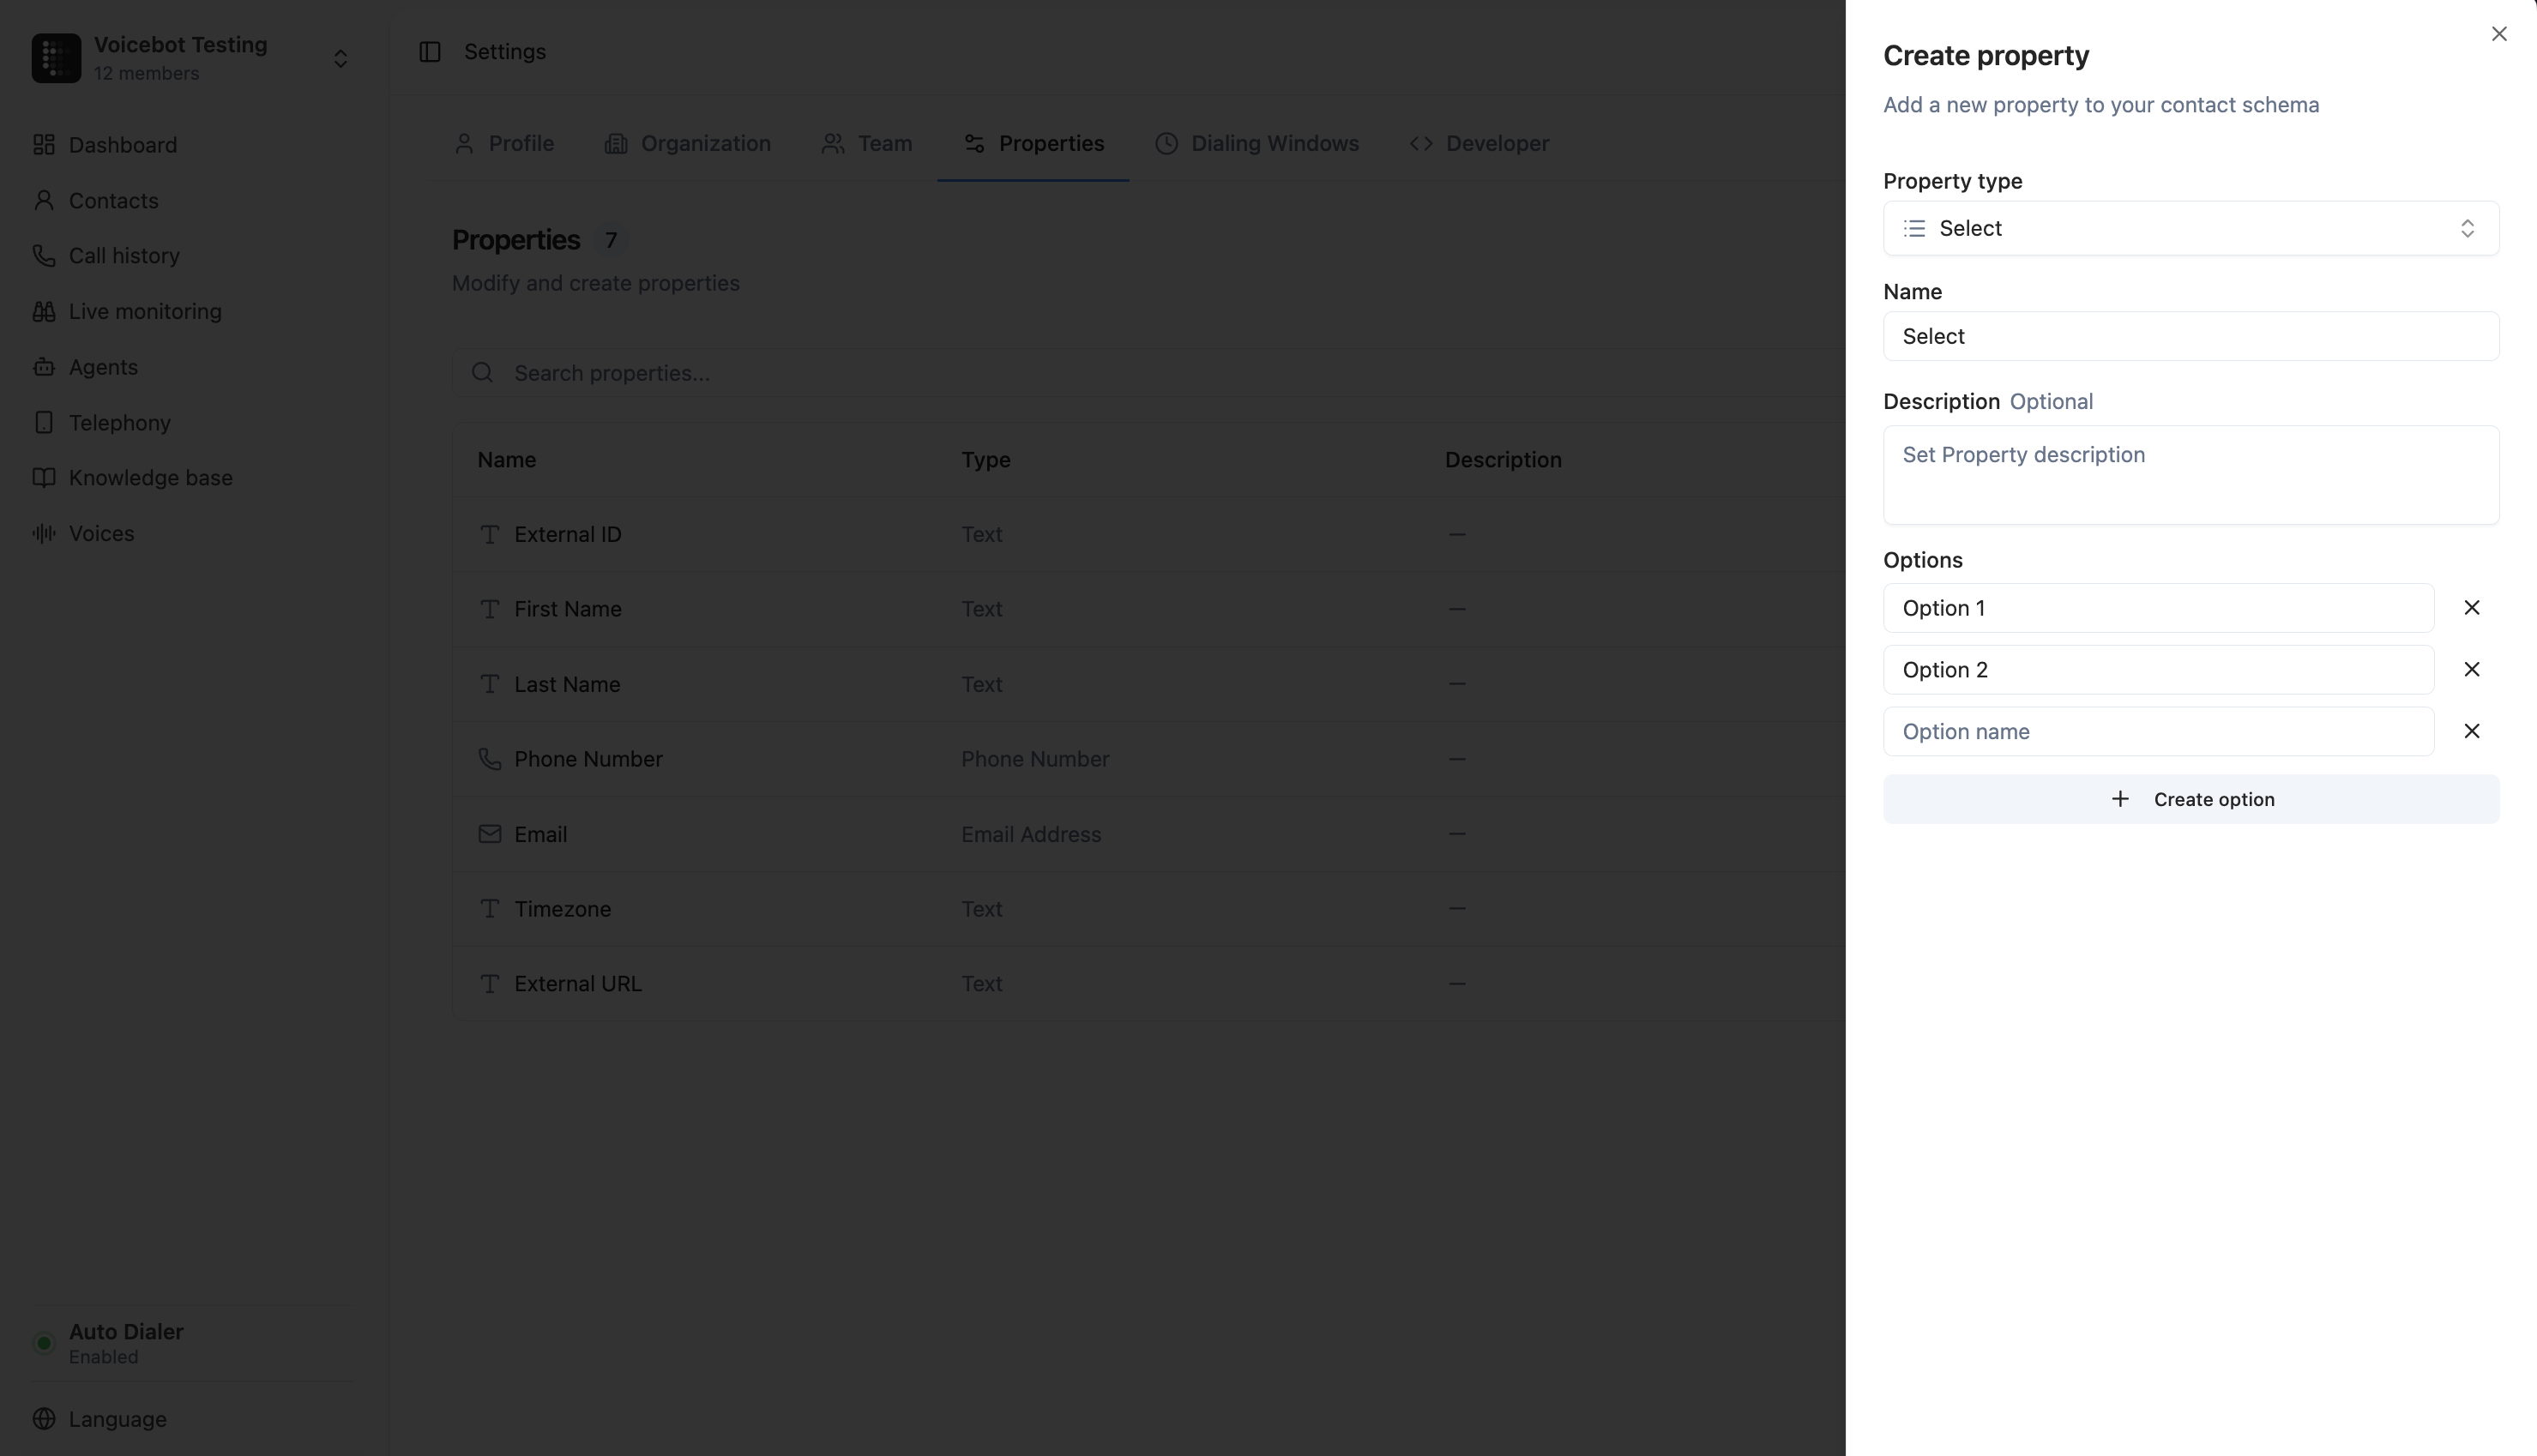
### 3. Configure the Property
Fill in the details for your new property:
* **Type** — Select the data type (e.g. Text, Select, Date)
* **Name** — Give it a clear, descriptive name (e.g. "Lead Source")
* **Description** *(optional)* — Add a note to help your team understand what this property is for
### 4. Add Options (Select & Multi-Select only)
If you chose **Select** or **Multi-Select**, you'll need to define the available options. Simply type the option name and press Enter to add it.
### 2. Click "Create Property"
Click the **Create property** button to open the property editor.
### 3. Configure the Property
Fill in the details for your new property:
* **Type** — Select the data type (e.g. Text, Select, Date)
* **Name** — Give it a clear, descriptive name (e.g. "Lead Source")
* **Description** *(optional)* — Add a note to help your team understand what this property is for
### 4. Add Options (Select & Multi-Select only)
If you chose **Select** or **Multi-Select**, you'll need to define the available options. Simply type the option name and press Enter to add it.
 ### 5. Save
Click **Save** and your new property is immediately available across all contacts.
***
## Editing Properties
You can edit an existing property at any time from the **Properties** tab in Settings. Click the menu icon next to any property and select **Edit**.
You can change the **name** and **description** of any property. For Select and Multi-Select properties, you can also **add new options**.
### Important limitations when editing
* **You cannot change the property type** after creation. If you need a different type, create a new property and delete the old one
* **You cannot remove existing options** from Select or Multi-Select properties. This protects contacts that already have those values assigned. You can only add new options
***
## Deleting Properties
To delete a property, click the menu icon next to it and select **Delete**. You'll be asked to confirm.
### 5. Save
Click **Save** and your new property is immediately available across all contacts.
***
## Editing Properties
You can edit an existing property at any time from the **Properties** tab in Settings. Click the menu icon next to any property and select **Edit**.
You can change the **name** and **description** of any property. For Select and Multi-Select properties, you can also **add new options**.
### Important limitations when editing
* **You cannot change the property type** after creation. If you need a different type, create a new property and delete the old one
* **You cannot remove existing options** from Select or Multi-Select properties. This protects contacts that already have those values assigned. You can only add new options
***
## Deleting Properties
To delete a property, click the menu icon next to it and select **Delete**. You'll be asked to confirm.
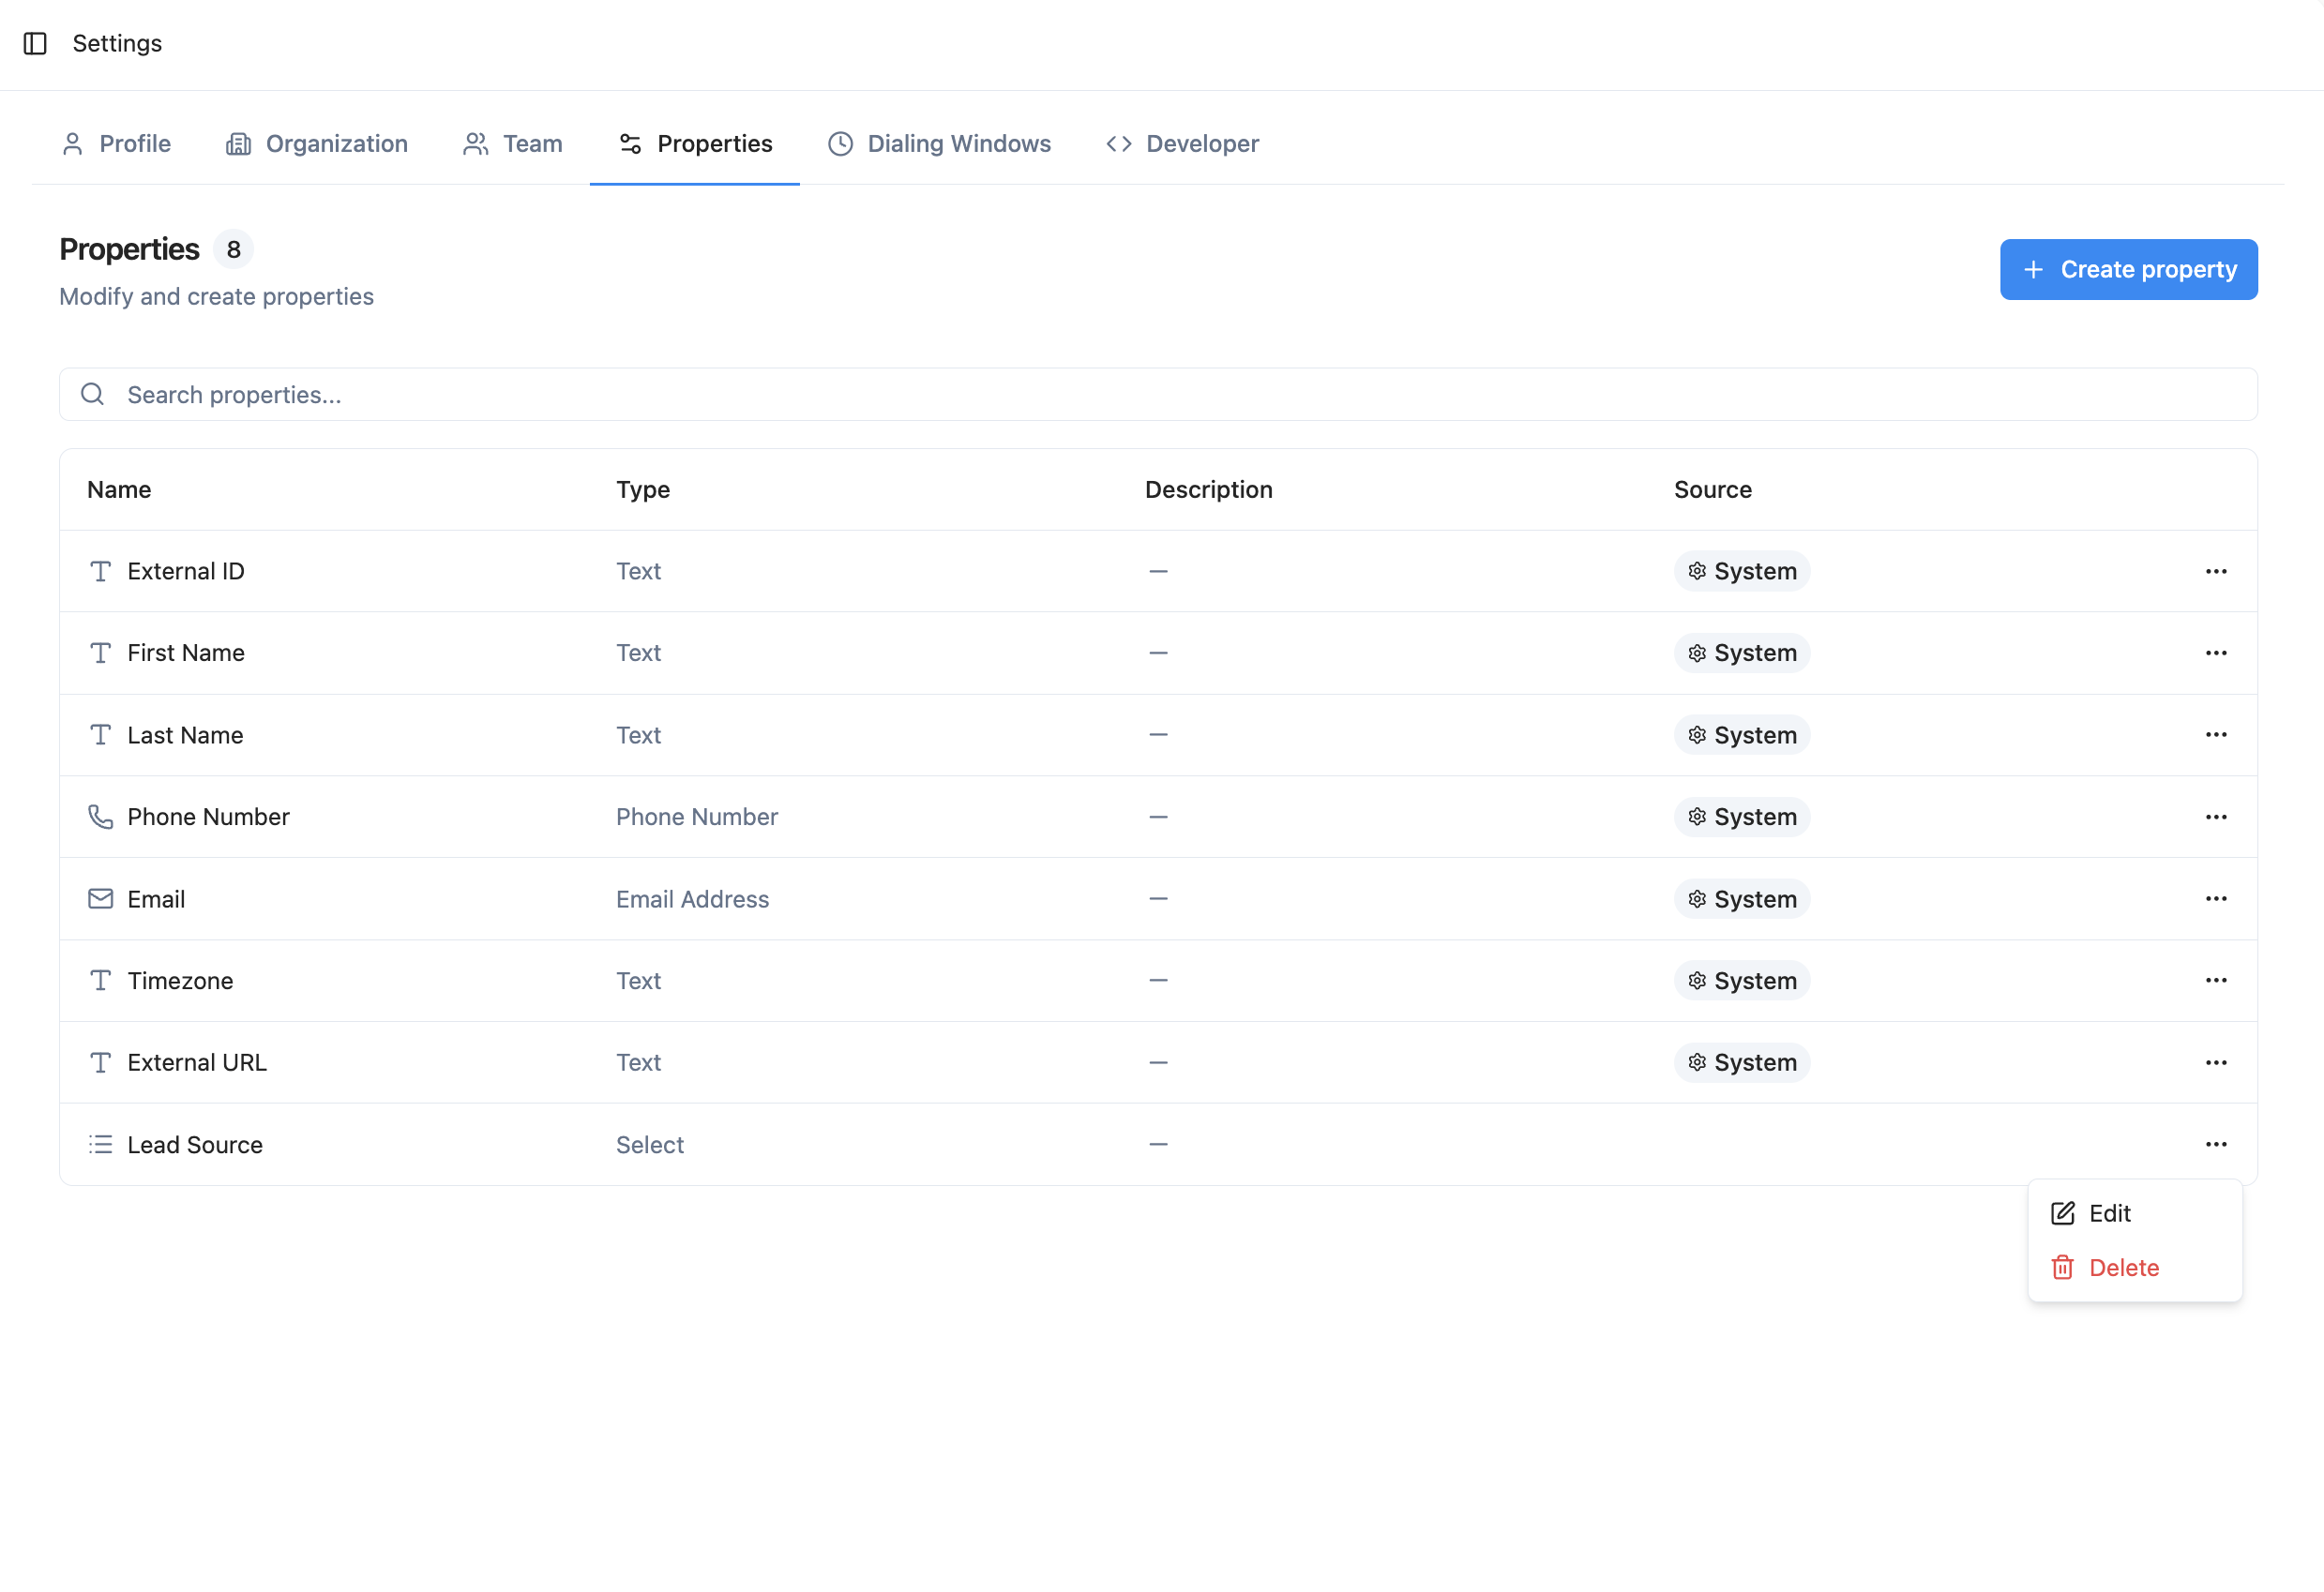 > **Warning:** Deleting a property permanently removes it and its values from all contacts. This action cannot be undone.
***
## Using Properties on Contacts
### In the Contact Details Panel
When you open a contact, you'll see your custom properties listed under the **Custom Properties** section. Each property renders with an appropriate input — a date picker for dates, a dropdown for select fields, checkboxes for multi-select, and so on.
> **Warning:** Deleting a property permanently removes it and its values from all contacts. This action cannot be undone.
***
## Using Properties on Contacts
### In the Contact Details Panel
When you open a contact, you'll see your custom properties listed under the **Custom Properties** section. Each property renders with an appropriate input — a date picker for dates, a dropdown for select fields, checkboxes for multi-select, and so on.
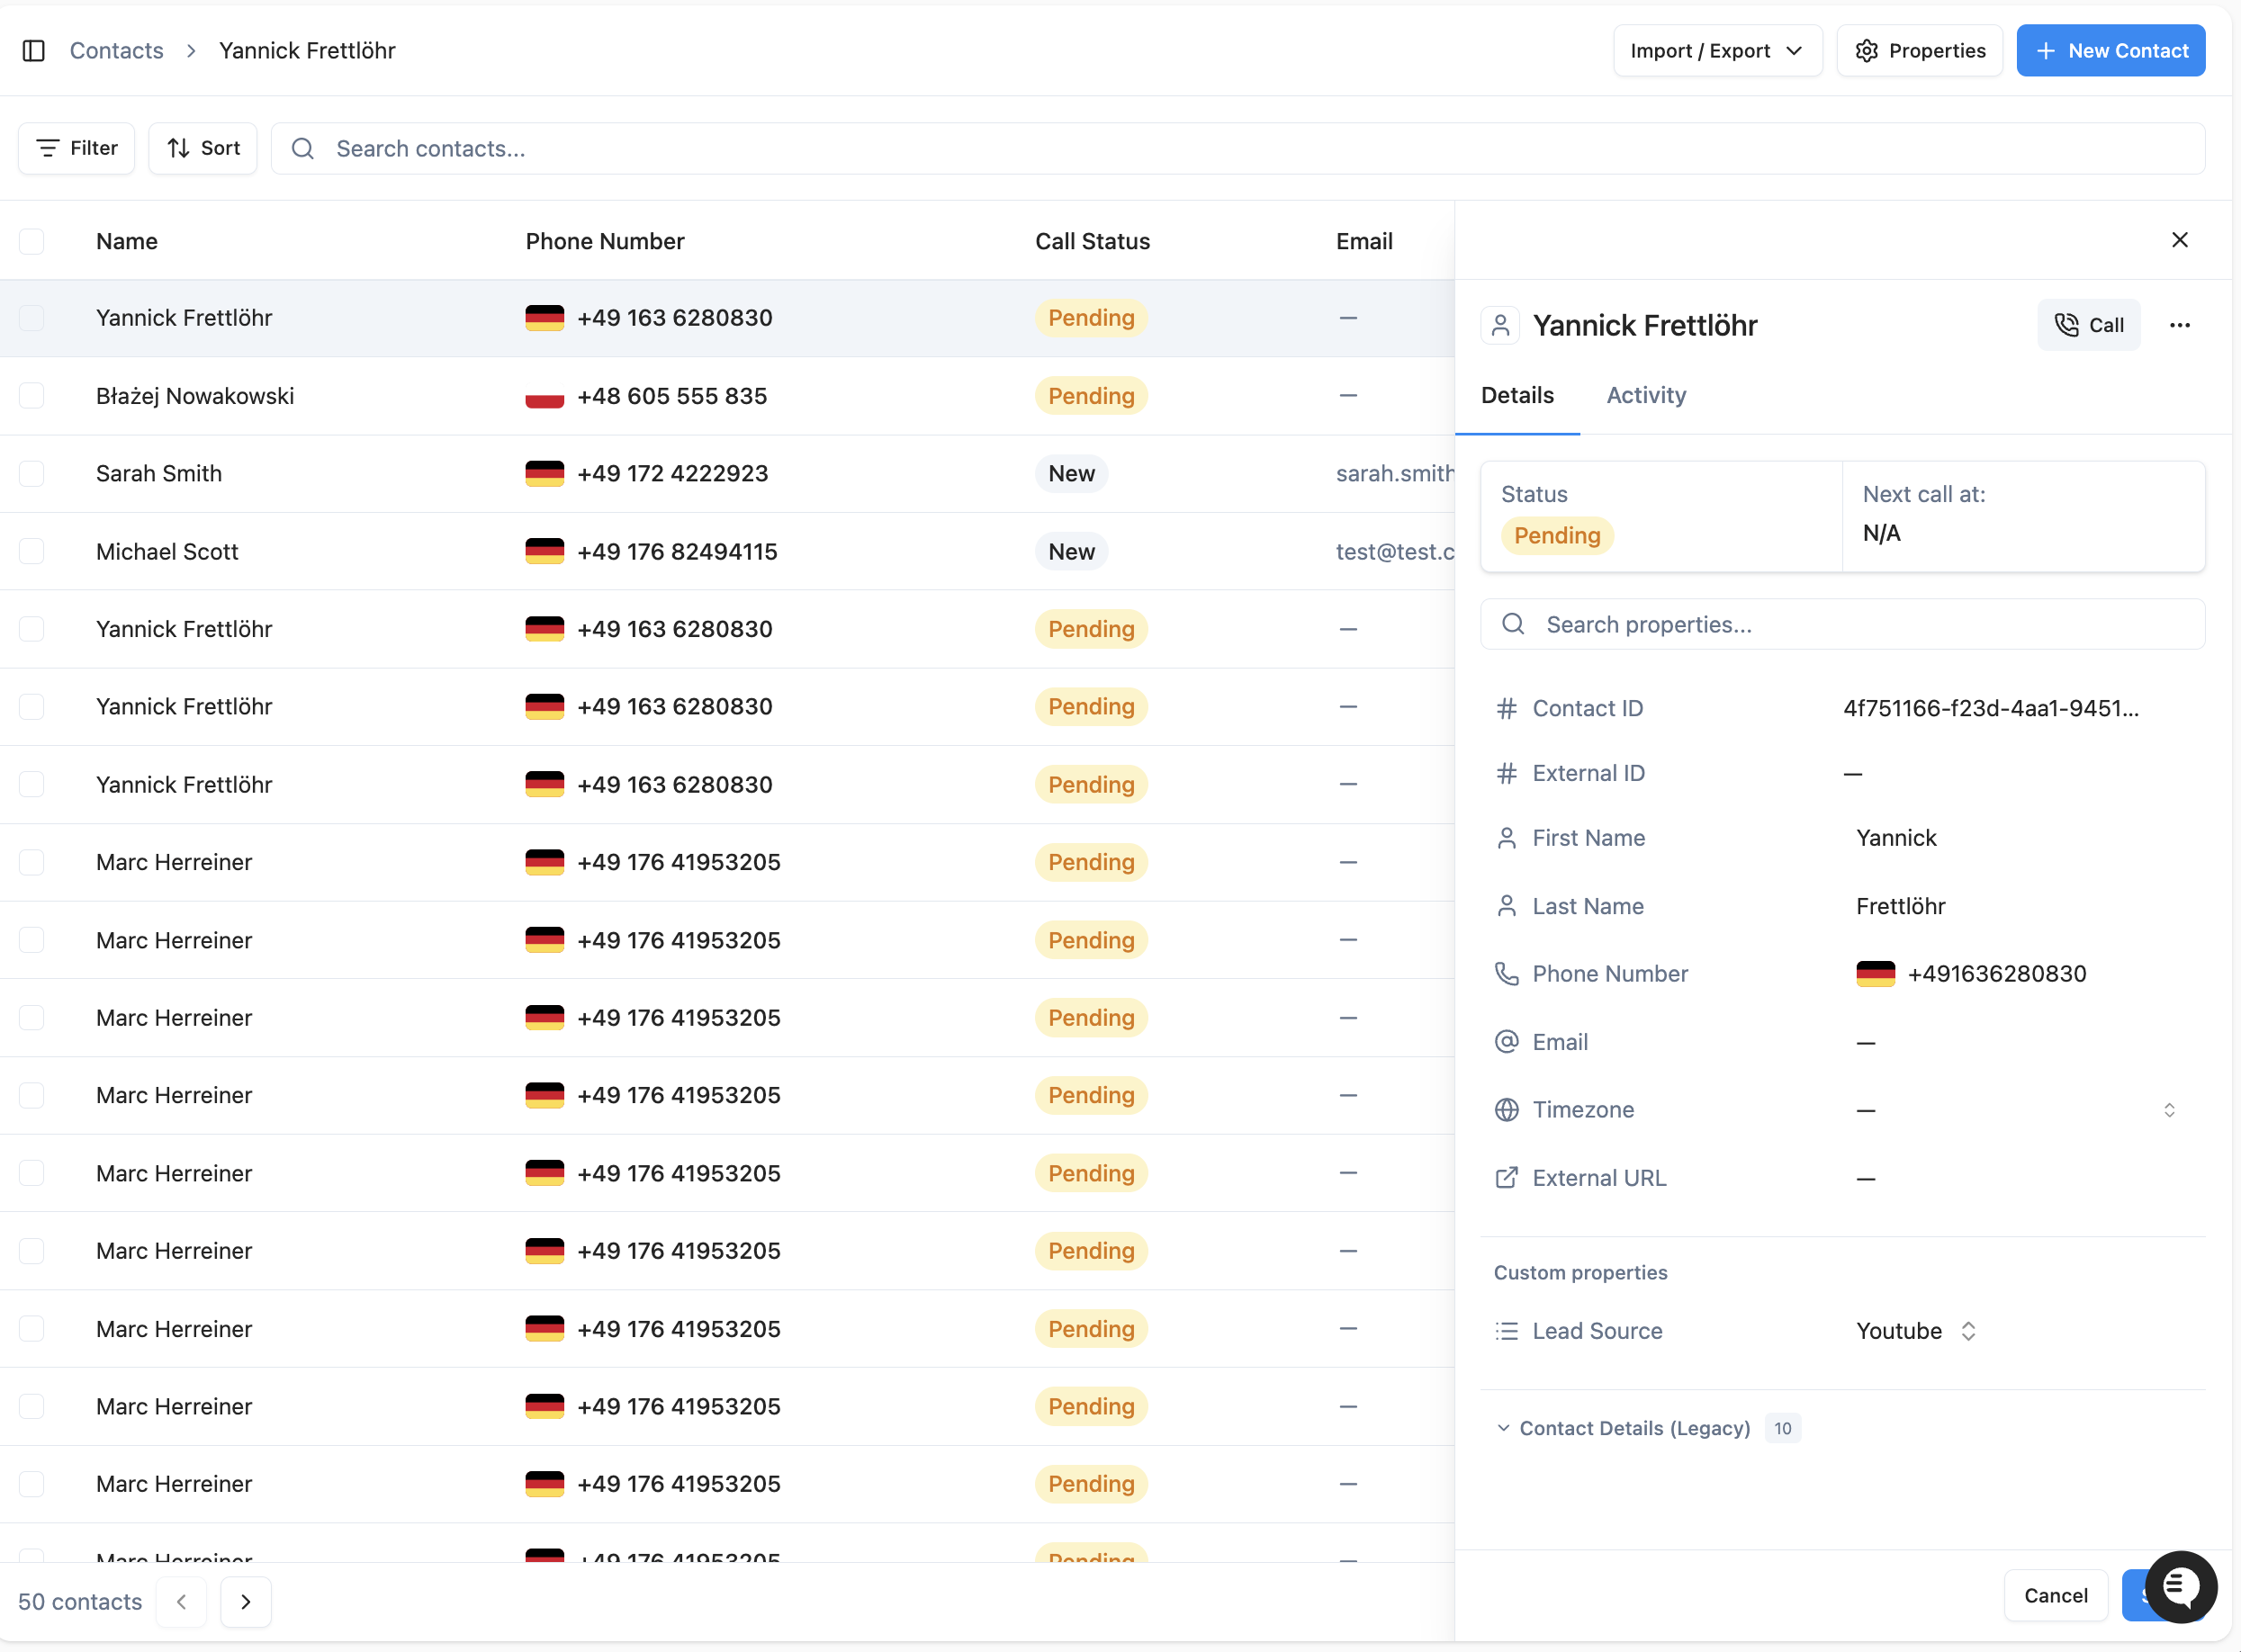 Simply click on any property value to edit it, then hit **Save** to persist your changes.
### In the Contacts Table
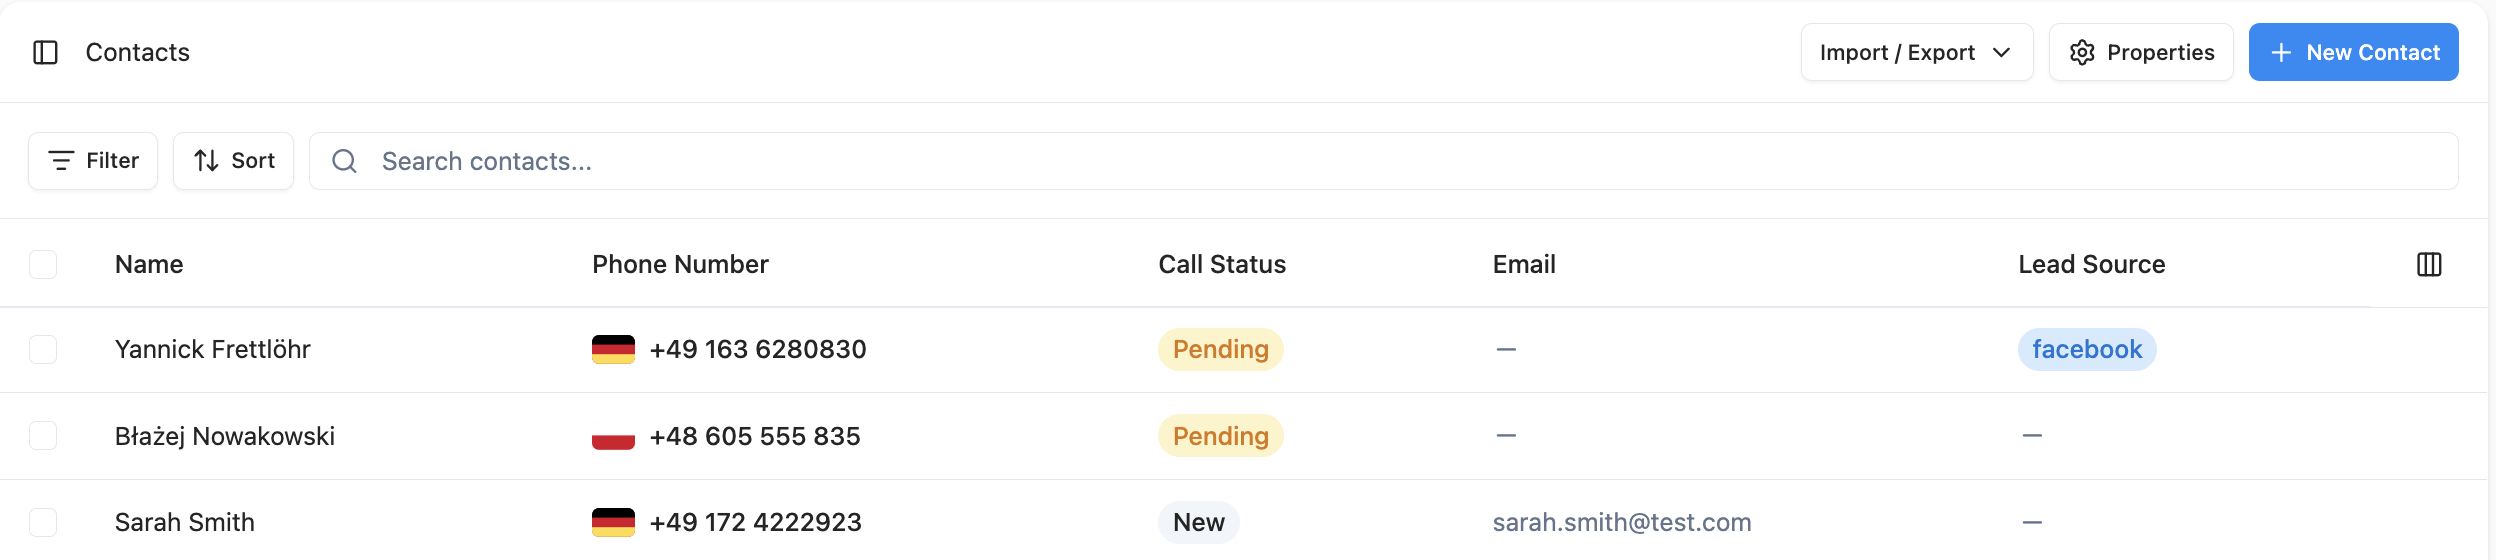
You can show your custom properties as columns in the contacts table. Click the **column picker** icon to toggle which properties are visible.
Simply click on any property value to edit it, then hit **Save** to persist your changes.
### In the Contacts Table
You can show your custom properties as columns in the contacts table. Click the **column picker** icon to toggle which properties are visible.
 ### In Agent Prompts
You can reference contact properties inside your agent's prompt so the AI personalizes its conversation based on each contact's data. This is done through the **Variables** panel in the Agent Builder.
#### The Variables Tab
When editing an agent prompt in the Agent Builder, expand the **Variables** panel at the bottom of the editor. It shows three categories of variables you can insert into your prompt:
| Category | Description |
| ---------------------- | --------------------------------------------------------------------------- |
| **Custom variables** | Variables you define yourself — useful for values you want to set per agent |
| **Contact properties** | Your custom contact properties, automatically available as variables |
| **Read only** | System variables like `currentDate`, `firstName`, or `callDirection` |
Your contact properties appear automatically in the **Contact properties** section — no extra setup needed. Click any variable to copy it to your clipboard, then paste it into your prompt.
#### Referencing Variables in the Prompt
Variables use the `{{variableName}}` syntax. When you type `{{` in the prompt editor, an autocomplete dropdown appears with all available variables grouped by category. Select a variable to insert it as a styled chip in the editor.
For example, a prompt might look like:
```
You are a customer service agent. The caller's name is {{firstName}}.
Their loyalty tier is {{Loyalty Tier}} and their preferred language
is {{Preferred Language}}.
```
Contact property variables display their human-readable name (e.g. "Loyalty Tier") in the editor, making prompts easy to read and maintain.
#### How It Works at Runtime
When a call starts, telli replaces each `{{variable}}` with the actual value from the contact's data. If a contact has "Loyalty Tier" set to "Gold", the agent receives a prompt with that value filled in. Variables that don't have a value for a given contact are removed from the prompt automatically.
***
## Properties in CSV Import
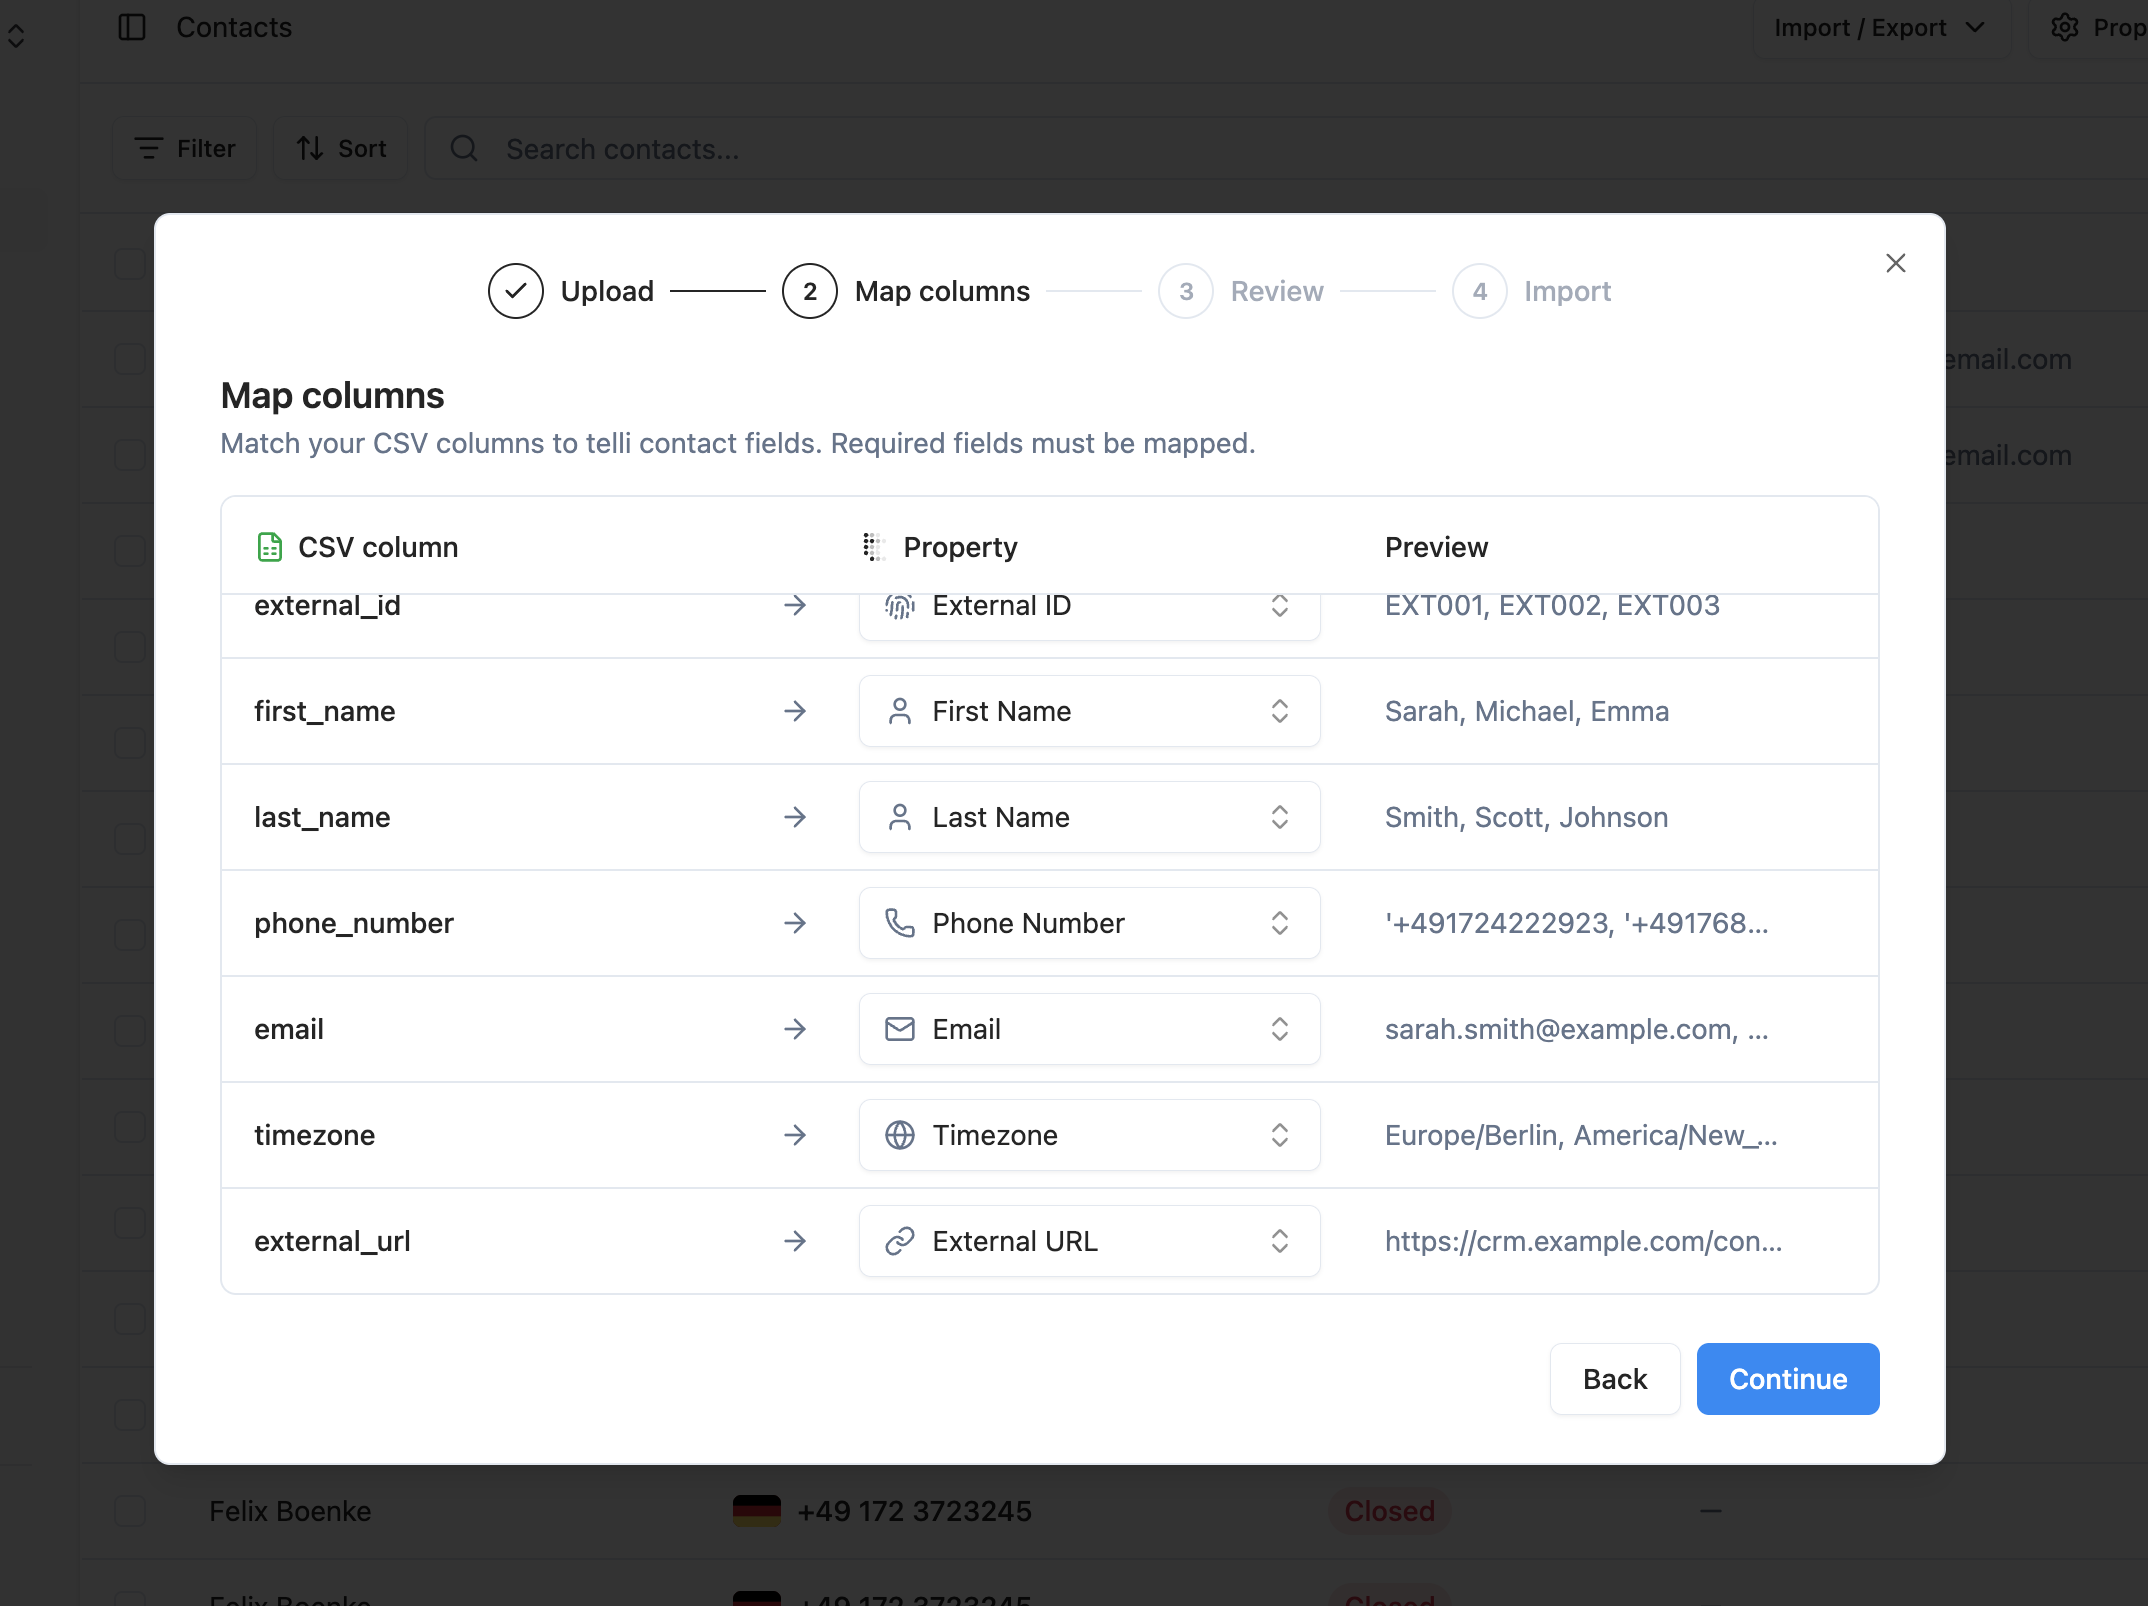
When you import contacts via CSV, you can map CSV columns directly to your custom properties.
### Automatic Mapping
telli automatically detects properties by key, label, or the `Label (key)` header format used in the CSV template.
### Manual Mapping
During import, you can map any CSV column to an existing custom property or create a new one directly in the wizard.
In the import wizard, you can create these property types:
* Text
* Number
* Boolean
* Date
* Date & Time
* Phone Number
* Email
For existing **Select** and **Multi-Select** properties, map the CSV column to that property during the mapping step. For multi-select properties, separate multiple values in one cell with commas.
For the full CSV import flow, supported system fields, and scheduling options, see [Contacts](./contacts#csv-import).
### In Agent Prompts
You can reference contact properties inside your agent's prompt so the AI personalizes its conversation based on each contact's data. This is done through the **Variables** panel in the Agent Builder.
#### The Variables Tab
When editing an agent prompt in the Agent Builder, expand the **Variables** panel at the bottom of the editor. It shows three categories of variables you can insert into your prompt:
| Category | Description |
| ---------------------- | --------------------------------------------------------------------------- |
| **Custom variables** | Variables you define yourself — useful for values you want to set per agent |
| **Contact properties** | Your custom contact properties, automatically available as variables |
| **Read only** | System variables like `currentDate`, `firstName`, or `callDirection` |
Your contact properties appear automatically in the **Contact properties** section — no extra setup needed. Click any variable to copy it to your clipboard, then paste it into your prompt.
#### Referencing Variables in the Prompt
Variables use the `{{variableName}}` syntax. When you type `{{` in the prompt editor, an autocomplete dropdown appears with all available variables grouped by category. Select a variable to insert it as a styled chip in the editor.
For example, a prompt might look like:
```
You are a customer service agent. The caller's name is {{firstName}}.
Their loyalty tier is {{Loyalty Tier}} and their preferred language
is {{Preferred Language}}.
```
Contact property variables display their human-readable name (e.g. "Loyalty Tier") in the editor, making prompts easy to read and maintain.
#### How It Works at Runtime
When a call starts, telli replaces each `{{variable}}` with the actual value from the contact's data. If a contact has "Loyalty Tier" set to "Gold", the agent receives a prompt with that value filled in. Variables that don't have a value for a given contact are removed from the prompt automatically.
***
## Properties in CSV Import
When you import contacts via CSV, you can map CSV columns directly to your custom properties.
### Automatic Mapping
telli automatically detects properties by key, label, or the `Label (key)` header format used in the CSV template.
### Manual Mapping
During import, you can map any CSV column to an existing custom property or create a new one directly in the wizard.
In the import wizard, you can create these property types:
* Text
* Number
* Boolean
* Date
* Date & Time
* Phone Number
* Email
For existing **Select** and **Multi-Select** properties, map the CSV column to that property during the mapping step. For multi-select properties, separate multiple values in one cell with commas.
For the full CSV import flow, supported system fields, and scheduling options, see [Contacts](./contacts#csv-import).
 ***
## System Properties vs. Custom Properties
telli distinguishes between two kinds of properties:
| | System Properties | Custom Properties |
| -------------------- | ------------------------------------------ | ------------------------------------ |
| **Examples** | First Name, Last Name, Phone Number, Email | Lead Source, Contract Date, Language |
| **Who defines them** | Built into telli | Created by you |
| **Can be edited** | Values can be edited | Values and definitions can be edited |
| **Can be deleted** | No | Yes |
System properties are the core fields every contact has. Custom properties are the fields you add to match your business needs.
***
## Current Limits
| Resource | Limit |
| ------------------------------- | --------------------------------------------------------------------------------------- |
| Property types available | 9 (Text, Number, Boolean, Date, Date & Time, Select, Multi-Select, Phone Number, Email) |
| Options per Select/Multi-Select | Unlimited (append-only — existing options cannot be removed) |
| Property type changes | Not supported after creation |
> **Note:** These limits may change as we continue to improve the platform.
***
**💡 Pro tip:** Start by defining properties for the data your agents reference most during calls — things like customer tier, contract type, or preferred language. Once defined, reference them in your agent prompt via the Variables panel in the Agent Builder to deliver personalized conversations automatically.
***
## System Properties vs. Custom Properties
telli distinguishes between two kinds of properties:
| | System Properties | Custom Properties |
| -------------------- | ------------------------------------------ | ------------------------------------ |
| **Examples** | First Name, Last Name, Phone Number, Email | Lead Source, Contract Date, Language |
| **Who defines them** | Built into telli | Created by you |
| **Can be edited** | Values can be edited | Values and definitions can be edited |
| **Can be deleted** | No | Yes |
System properties are the core fields every contact has. Custom properties are the fields you add to match your business needs.
***
## Current Limits
| Resource | Limit |
| ------------------------------- | --------------------------------------------------------------------------------------- |
| Property types available | 9 (Text, Number, Boolean, Date, Date & Time, Select, Multi-Select, Phone Number, Email) |
| Options per Select/Multi-Select | Unlimited (append-only — existing options cannot be removed) |
| Property type changes | Not supported after creation |
> **Note:** These limits may change as we continue to improve the platform.
***
**💡 Pro tip:** Start by defining properties for the data your agents reference most during calls — things like customer tier, contract type, or preferred language. Once defined, reference them in your agent prompt via the Variables panel in the Agent Builder to deliver personalized conversations automatically.