> ## Documentation Index
> Fetch the complete documentation index at: https://docs.telli.com/llms.txt
> Use this file to discover all available pages before exploring further.
# Data Collection
> Actively collect and validate structured data from callers during a call
Collect Data lets you define structured fields that the AI agent actively collects during a conversation. The agent asks the caller, validates the input, and confirms it -- all in real-time.
> **At a glance**
>
> * Configure fields per agent under **Collect Data**
> * Choose a data type: Email, License Plate, Digits, Address, or Custom
> * Add optional validators to Custom fields for data quality
> * Customize task behavior when a field needs special collection or confirmation instructions
> * View results in **Conversation History** and receive them via [webhook](/receive-call-data)
**Collect Data vs Call Analysis:** [Call Analysis](/deep-dives/call-analysis)
passively extracts information from the transcript *after* the call. Collect
Data is an *active, in-call* process -- the agent asks the caller directly,
validates their response, and confirms it before moving on.
***
## Data types
### Email
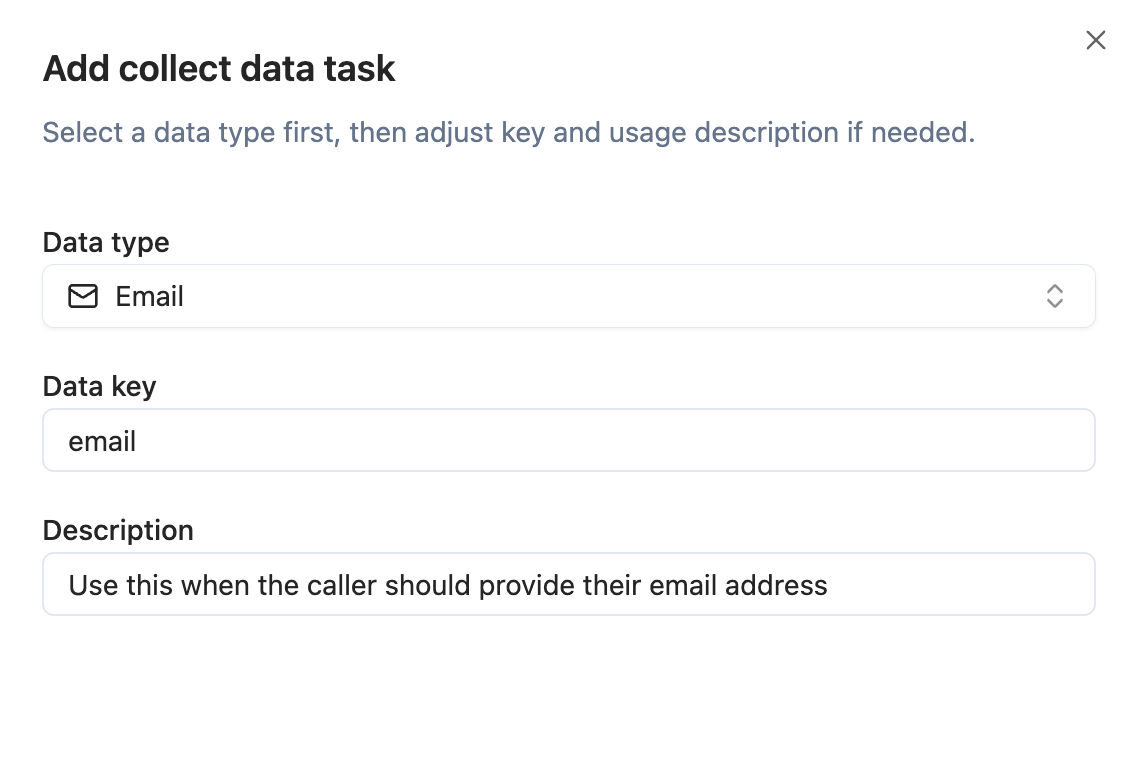
Collects and validates an email address from the caller. The agent guides the caller through spelling out the address and confirms it.
### License Plate
Collects and validates a license plate number. Currently supports German license plates.
### Digits
Collects number-only values such as order numbers, PINs, or customer IDs. You can optionally set minimum and maximum length.
### Address
Collects a postal address from the caller, including street address, ZIP/postal code, city, and country. The agent validates the address with Google Maps, asks for missing details when needed, and confirms the final address with the caller.
### Custom
Collects any freeform data with optional validators for quality control:
| Validator | Description |
| ---------------------- | --------------------------------------------------------------------------------------- |
| **Exact length** | Value must be exactly N characters |
| **Min/max length** | Value must be between N and M characters |
| **Alphabet** | Restrict allowed characters (lowercase, uppercase, numbers, special characters, spaces) |
| **Regular expression** | Value must match a regex pattern (provide a human-readable description for the agent) |
Use validators to ensure data quality. For example, a 6-digit case number
could use "exact length = 6" and "alphabet = numbers only".
***
## Setting up Collect Data
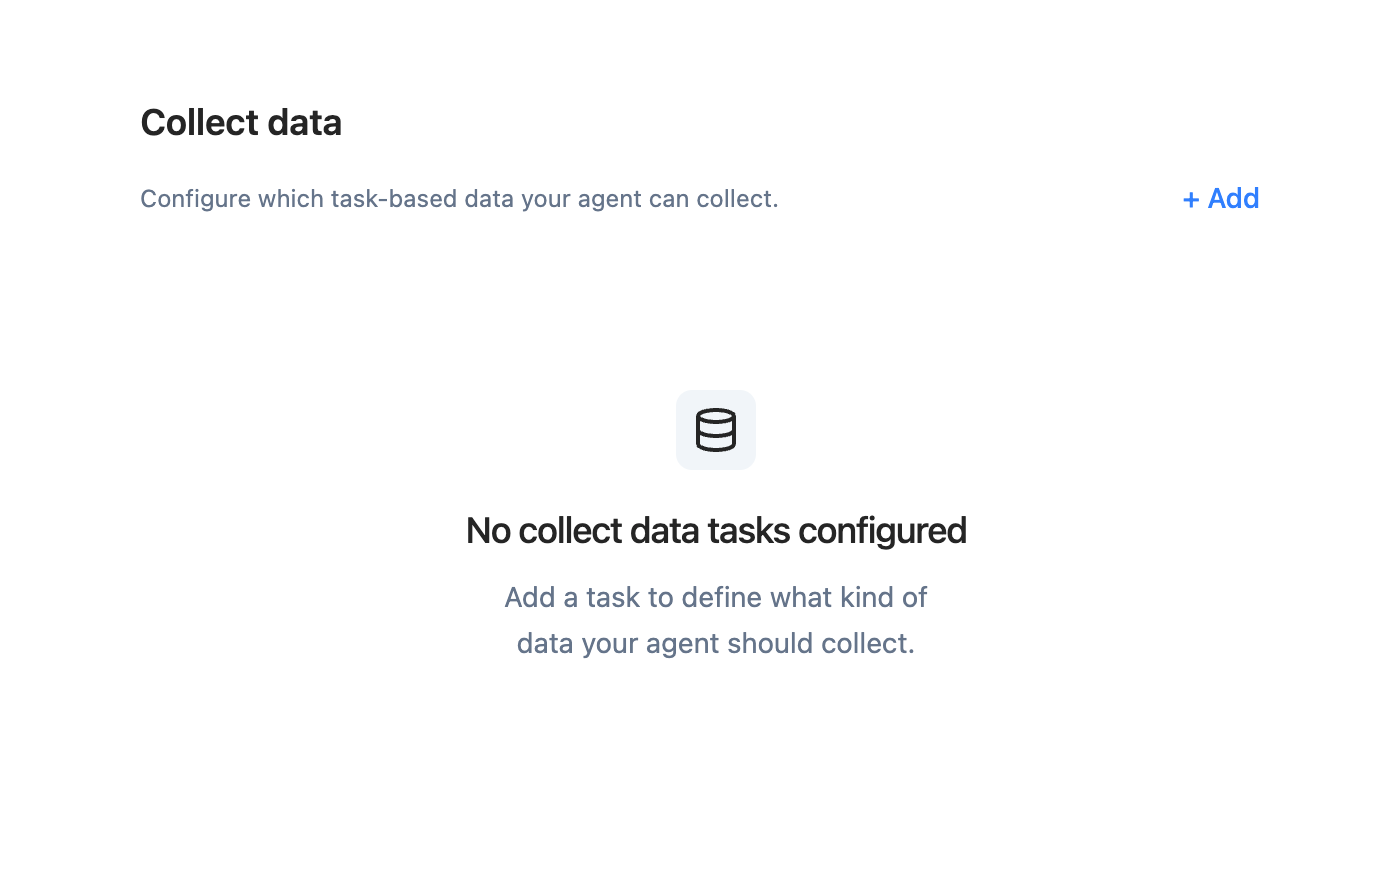
1. Go to **Agents > \[agent] > Collect Data**
2. Click **Add** and select a data type (Email, License Plate, Digits, Address, or Custom)
 3. Set the **key** -- this identifier appears in the webhook payload and UI
 4. Keep **Behavior** set to **Auto** for the built-in collection flow, or choose **Prompt** to add instructions for how this specific field should be collected and confirmed.
Use the main prompt to tell the agent when to start a Collect Data task. Use
the task's Behavior setting for how the collect-data sub-agent should ask,
repeat, spell back, or confirm the value once the task has started.
***
## How it works during a call
When the agent determines it's time to collect data (based on your description), it starts an interactive sub-conversation:
1. The agent asks the caller for the information
2. The caller provides the data
3. The agent validates it against the configured type and constraints
4. The agent reads back the value and asks the caller to confirm
5. The caller confirms or corrects it
The caller can also **decline** to provide the data. In that case the status is set to `declined`.
***
## Adjust the prompt
After adding Collect Data tasks, you **must** update your agent's prompt in
the [Agent Builder](/deep-dives/agent-builder) to tell the agent when and how
to use them. Without prompt instructions, the agent won't know when to collect
the data.
Adding Collect Data tasks makes a `collect_data` tool available to the agent, but the agent needs instructions in the prompt to know *when* to trigger it. Open the Agent Builder and add clear instructions that specify the trigger and the order relative to other steps.
**Example: Appointment booking with email collection**
```
When the caller wants to book an appointment:
1. First, use the collect_data tool to collect their email address.
2. Then, proceed with finding an available time slot.
3. Only confirm the booking after the email has been successfully collected.
```
**Example: Support ticket with case number**
```
At the start of every support call, ask the caller for their case number
and use the collect_data tool to collect it. If they don't have one,
continue without it but let them know a new case will be created.
```
**Example: Insurance claim with license plate**
```
When the caller wants to file a claim:
1. Use the collect_data tool to collect their license plate number.
2. Use the collect_data tool to collect their email address for the confirmation.
3. Then gather the details of the incident.
```
**Example: Delivery with address collection**
```text theme={null}
When the caller needs something delivered by post:
1. Use the collect_data tool to collect their postal address.
2. Ask for street address, ZIP or postal code, city, and country.
3. Only continue with the delivery confirmation after the address has been successfully validated/collected.
```
The more specific you are about the timing and order, the more reliably the agent will collect at the right moment in the conversation.
***
## Results
### Conversation History
Navigate to **Conversation History**, click on a call, and scroll to the **Collect Data** section. Each field shows:
* **Field name** -- the key you defined
* **Value** -- the collected data, or empty if not collected
* **Status badge:**
* **Confirmed** -- caller confirmed the value
* **Declined** -- caller declined to provide the data
* **Error** -- collection failed due to an error
* **In progress** -- collection started but the call ended before completion
### Webhooks
Collect Data results are included in the [`call_ended` webhook event](/receive-call-data#call-ended-event) as a `collected_data` field. See the [webhook documentation](/receive-call-data) for the full payload format.
***
## Best practices
* **Write clear descriptions** so the agent knows exactly when and what to collect. Vague descriptions lead to inconsistent collection behavior.
* **Add validators** to Custom fields to reduce errors. A regex validator with a human-readable description helps the agent explain requirements to the caller.
* **Mention collection in your prompt** -- reference when the agent should trigger each collection task in your prompt instructions.
* **Use Behavior for collection style** -- put spelling, read-back, repeat, and confirmation instructions in the task's Behavior setting rather than the main prompt.
4. Keep **Behavior** set to **Auto** for the built-in collection flow, or choose **Prompt** to add instructions for how this specific field should be collected and confirmed.
Use the main prompt to tell the agent when to start a Collect Data task. Use
the task's Behavior setting for how the collect-data sub-agent should ask,
repeat, spell back, or confirm the value once the task has started.
***
## How it works during a call
When the agent determines it's time to collect data (based on your description), it starts an interactive sub-conversation:
1. The agent asks the caller for the information
2. The caller provides the data
3. The agent validates it against the configured type and constraints
4. The agent reads back the value and asks the caller to confirm
5. The caller confirms or corrects it
The caller can also **decline** to provide the data. In that case the status is set to `declined`.
***
## Adjust the prompt
After adding Collect Data tasks, you **must** update your agent's prompt in
the [Agent Builder](/deep-dives/agent-builder) to tell the agent when and how
to use them. Without prompt instructions, the agent won't know when to collect
the data.
Adding Collect Data tasks makes a `collect_data` tool available to the agent, but the agent needs instructions in the prompt to know *when* to trigger it. Open the Agent Builder and add clear instructions that specify the trigger and the order relative to other steps.
**Example: Appointment booking with email collection**
```
When the caller wants to book an appointment:
1. First, use the collect_data tool to collect their email address.
2. Then, proceed with finding an available time slot.
3. Only confirm the booking after the email has been successfully collected.
```
**Example: Support ticket with case number**
```
At the start of every support call, ask the caller for their case number
and use the collect_data tool to collect it. If they don't have one,
continue without it but let them know a new case will be created.
```
**Example: Insurance claim with license plate**
```
When the caller wants to file a claim:
1. Use the collect_data tool to collect their license plate number.
2. Use the collect_data tool to collect their email address for the confirmation.
3. Then gather the details of the incident.
```
**Example: Delivery with address collection**
```text theme={null}
When the caller needs something delivered by post:
1. Use the collect_data tool to collect their postal address.
2. Ask for street address, ZIP or postal code, city, and country.
3. Only continue with the delivery confirmation after the address has been successfully validated/collected.
```
The more specific you are about the timing and order, the more reliably the agent will collect at the right moment in the conversation.
***
## Results
### Conversation History
Navigate to **Conversation History**, click on a call, and scroll to the **Collect Data** section. Each field shows:
* **Field name** -- the key you defined
* **Value** -- the collected data, or empty if not collected
* **Status badge:**
* **Confirmed** -- caller confirmed the value
* **Declined** -- caller declined to provide the data
* **Error** -- collection failed due to an error
* **In progress** -- collection started but the call ended before completion
### Webhooks
Collect Data results are included in the [`call_ended` webhook event](/receive-call-data#call-ended-event) as a `collected_data` field. See the [webhook documentation](/receive-call-data) for the full payload format.
***
## Best practices
* **Write clear descriptions** so the agent knows exactly when and what to collect. Vague descriptions lead to inconsistent collection behavior.
* **Add validators** to Custom fields to reduce errors. A regex validator with a human-readable description helps the agent explain requirements to the caller.
* **Mention collection in your prompt** -- reference when the agent should trigger each collection task in your prompt instructions.
* **Use Behavior for collection style** -- put spelling, read-back, repeat, and confirmation instructions in the task's Behavior setting rather than the main prompt.